push time:2023-06-26 Popularity: source:1
Selection and wiring method of junction box
1. Overview
Due toWhen sensors leave the factory, the consistency of the sensors may not be ideal, coupled with the limitations of environmental factors and installation methods in on-site use, which brings imbalance issues to the parallel assembly of multiple sensors in the scale. To solve the above problems, it is necessary to choose a junction box to adjust the ratio of sensor coefficient to sensor output impedance (mV/V/& Omega;) to be close to the same, so as to ensure the balance of the entire scale body. Adjusting the level of the mechanical tabletop. For sensors with more than four sensors, due to various reasons, the mechanical tabletop and foundation are more or less deformed. The longer the use time, the more severe the deformation, resulting in inconsistent force on the sensors. Compensation by the potentiometer alone cannot compensate, so it should be adjusted first
The height of the sensor is within the range of a difference of (20-40) kg, and then compensated by a potentiometer to be basically the same. This is an iterative process. Due to the deformation of the mechanical table, adjusting one angle may affect two or even three angles, and only repeated testing is necessary.
2. Model and naming
Junction boxes can generally be divided into JB-4/6/8 series.
JB-4: Five hole junction box with four wires, suitable for electronic scales or systems using a combination of four sensors;
JB-6: Seven hole junction box with six wires, suitable for electronic scales or systems used in combination with six sensors;
JB-8: Nine hole junction box with eight wires, suitable for electronic scales or systems using a combination of eight sensors;
For electronic scales or systems with more than 10 sensors, the connection can be achieved through a combination of multiple junction boxes.
3. Technical Overview
(1) Stainless steel or aluminum alloy shell, dedicated sealing joint, durable and with good sealing performance.
(2) Adopting high-precision, low drift resistors and potentiometers to ensure the accuracy and stability of system operation.
(3) Special terminal blocks are used for sensor and signal cable connections to ensure reliable connection.
(4) There are reserved welding holes next to each wiring post that can be welded for both welding and inserting wiring, and can be selected independently.
(5) The welding points of the wiring are annotated with code identification, which is convenient for users to connect.
(6) PCB board is welded with protective components against surge and induced lightning, which can effectively prevent induced lightning and surge
4. Installation and debugging
(1) Installation
Fix the junction box in a suitable position on the scale body. Open the upper cover of the junction box.
Thread the sensor cable and instrument signal cable through the corresponding interface of the junction box, connect all cables according to the wiring diagram shown in the diagram, and tighten all nuts after completion. Unused interfaces should be blocked with sealing rubber gaskets or rubber putty, while tightening the nuts.
Connect the external shielding of all cable cables to the grounding post of the junction box.
(2) Debugging
According to the output signal size of the sensor, refer to the wiring diagram shown in the figure below and adjust the corresponding potentiometer. (Note: the potentiometer should not be adjusted too far) After debugging, the upper cover of the junction box should be covered and tightened with screws.
5. Wiring diagram (using four wire as an example)
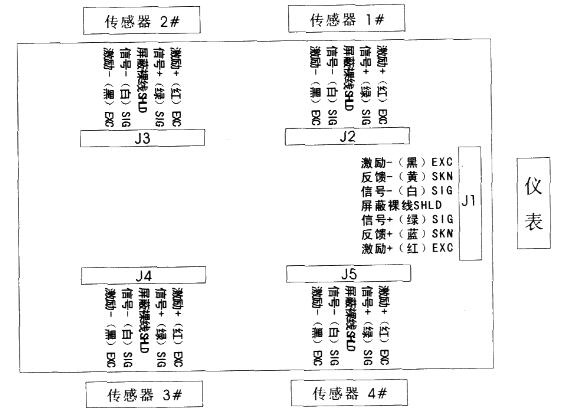
P1: Corresponding adjustment sensor 1#
P2: Corresponding adjustment sensor 2#
P3: Corresponding adjustment sensor 3#
P4: Corresponding adjustment sensor 4#
Note: 1. For scales that use different numbers of sensors, their sensor labels may be different. Please refer to the wiring diagram of the scale when wiring.

Sales contact information:
Miss Chen:
sales@zhongxintmt.com
Mr. Huang:
huanghao@zhongxintmt.com


 Sales Engineer - Miss Chen